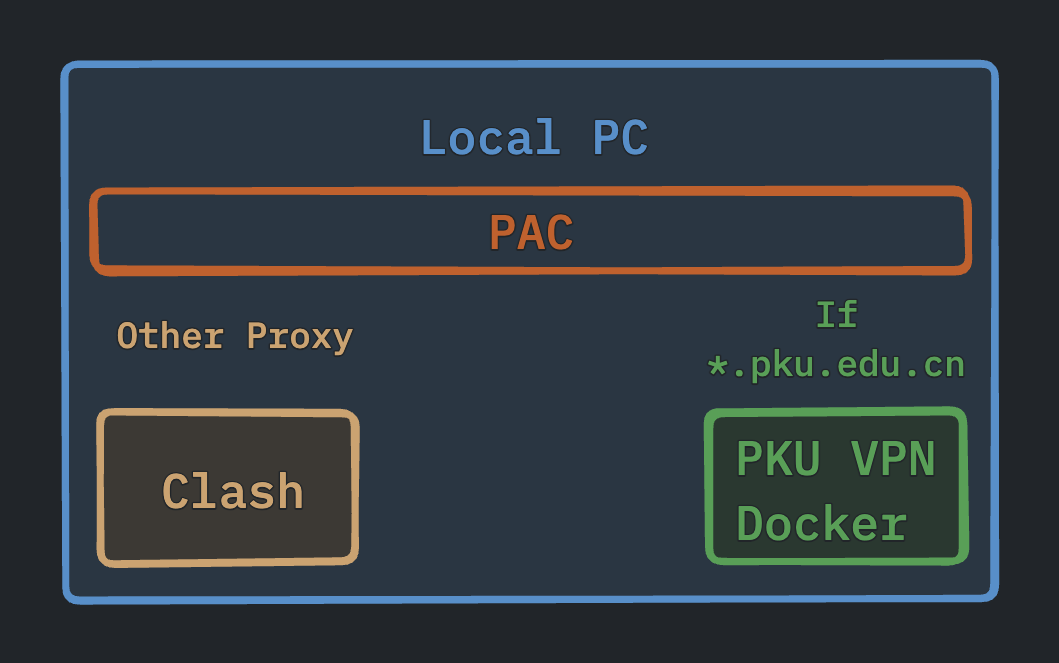
之前一直采用的是 openconnect 方案,然而其总是会造成断连之后的网络丢失,于是又经过一番折腾,我终于摸索出了最完美的 VPN 兼容使用方案,其可以做到:
- 对于所有
pku.edu.cn域名的地址,采用北大官方代理 - 对于所有其他地址,采用 Clash 代理
于是,我终于可以在家中同时打开 autolab.pku.edu.cn、链接 class_machine、然后还能随意的 google 了~
本文提供了两种方式:
- 自定义 PAC 方式:操作简单适合小白
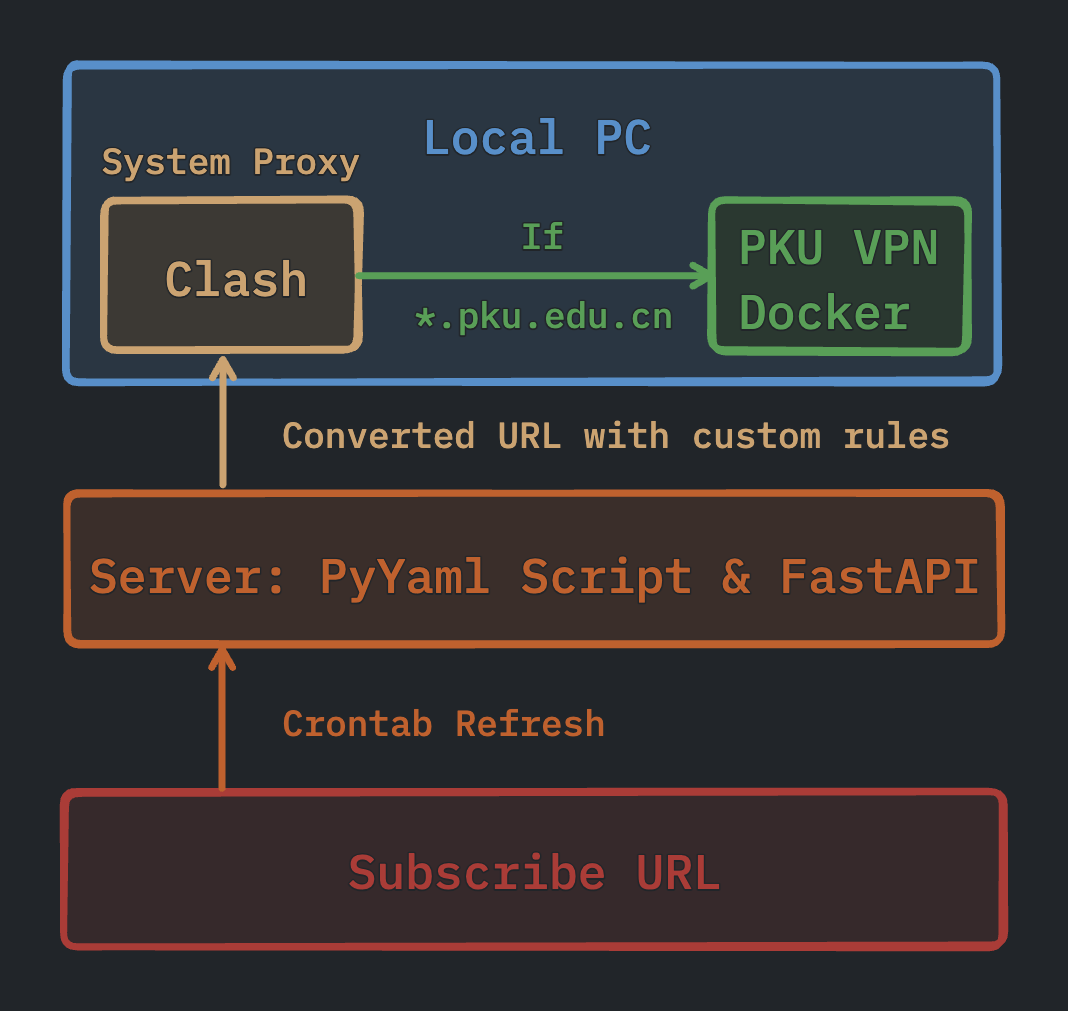
- 自定义 Clash 订阅方式:技术要求稍高,适合爱折腾还有强迫症的(比如我)
PKU VPN#
不同于官方提供的 Pulse Secure 应用程序方法,我们采用部署在 Docker 内的 Openconnect 方案:
在任意一个目录下新建 pku.env 文件,填写如下内容:
USER=Your student ID
PASS=Your password
URL=vpn.pku.edu.cn
OC_ARGS=--protocol=pulse
ID_CARD=Your ID card last 6 digits
PHONE_NUMBER=The 4th to 7th digits of your mobile phone number. e.g. 12345678910 -> 45672024.01.28 更新,此处一定要使用 pulse 协议才可以连接成功。以前使用的是 nc 协议。
2024.02.08 更新,受计算中心更新影响,需要重新拉取一下 Docker 镜像以适配更新。
然后,在当前目录下打开终端,使用 Docker 技术,拉取镜像并启动应用:
docker pull ghcr.io/thezzisu/ocproxy:latest
docker run -d --name pku-vpn --env-file=pku.env -p 11080:1080 ghcr.io/thezzisu/ocproxy:latest如果你没有 Docker,而且是 Mac,那我推荐使用 OrbStack ↗
这会在你的 11080 端口启动一个北大 VPN 的代理服务。
Docker 启动的已知问题:
-
有概率自动掉线,相较于终端直接使用
bashsudo openconnect --protocol=pulse https://vpn.pku.edu.cn不稳定,需要手动重启。
可以通过
docker logs查看,每次连接的有效期约为 12 小时。 -
当连接数过多时(超过 2 个,也偶见 1 个),脚本无法处理,需要使用 Pulse Secure 或者上文的openconnect指令进行连接后,手动关闭(顶掉)一个链接。已经通过在 Docker 内捕捉
SIGTERM信号解决(ICS 学的最好的一集,乐) -
若 Clash 规则没有排除
vpn.pku.edu.cn,则不兼容 Clash 的 TUN / 增强模式。
基于自定义 PAC 的分流(不推荐)#
不推荐这种方式,因为若想要终止代理还得进设置。与之相对的,后文基于 Clash 规则的分流只需要在菜单栏点击切换策略即可。

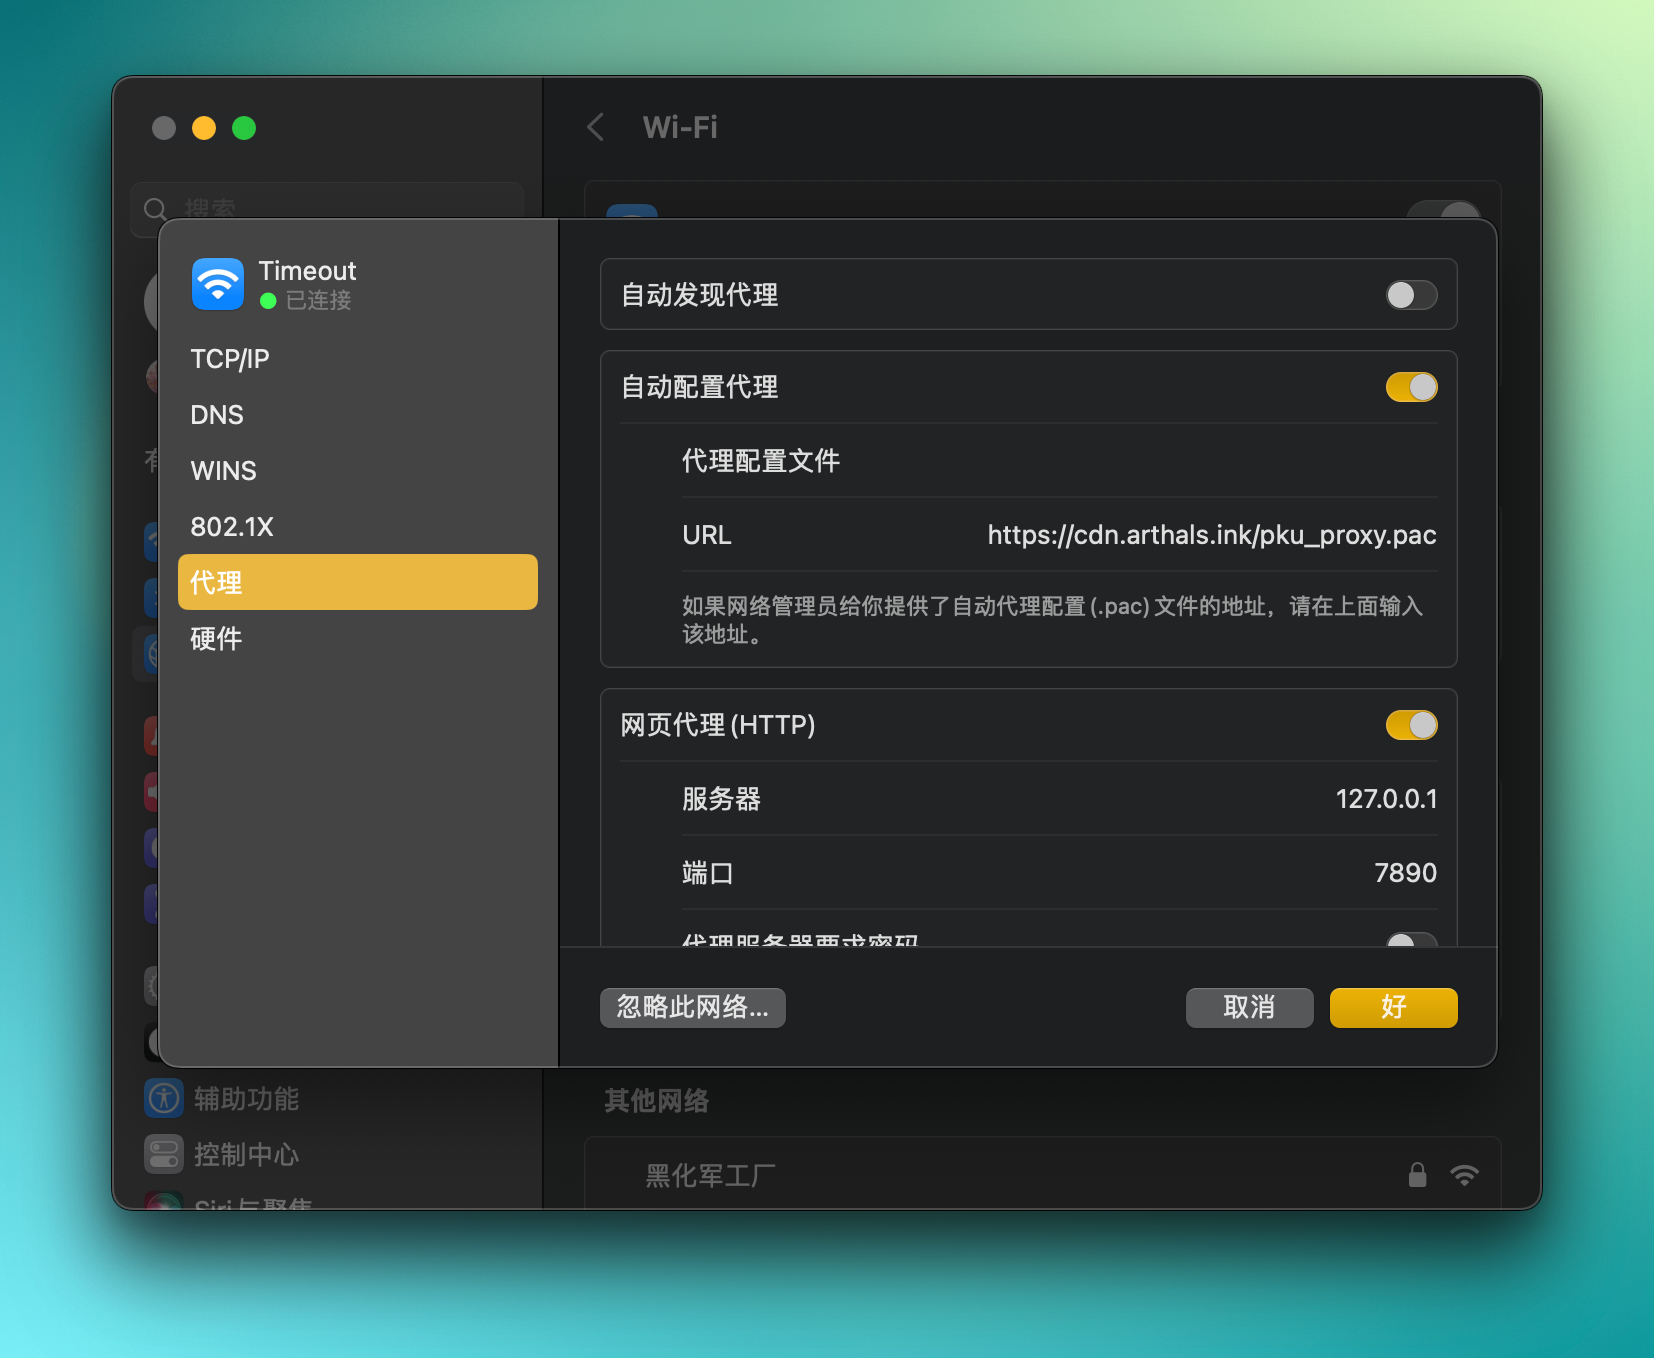
较为简单的方式,即通过 PAC 文件分流你的代理,在启动了 Docker 版的 PKU VPN 后,打开 系统设置 - 网络 - Wi-Fi - 详细信息 - 代理 - 自动配置代理:

填入如下 URL:
https://cdn.arthals.ink/pku_proxy.pac或者你也可以自行部署:
function FindProxyForURL(url, host) {
  if (shExpMatch(host, '*.pku.edu.cn')) {
    return 'SOCKS5 127.0.0.1:11080'
  }
  return 'PROXY 127.0.0.1:7890'
}基于自定义 Clash 配置文件的分流#

更优的方式,一次配好再也不管,切换比 PAC 方式简单,但是需要在现有订阅规则上进行修改。
不要觉得 Clash 规则很麻烦,其实就是一个类似于字典的东西。
我使用的是 PyYAML + FastAPI 的方案。
你也可以直接采用本地 parser 的方案。以下首先介绍自托管配置文件的配置方法。
服务端设置#
服务端的主要目标是在服务器上托管一个自动更新并覆写订阅的程序,这需要多个进程协同工作:
- 一个 Python 进程,基于 PyYAML 实现,用以更新并覆写订阅配置,使用 Crontab 每天定时执行
- 一个 Python 进程,基于 FastAPI 实现,用以提供一个暴露配置文件的接口,从而为客户端自动更新提供订阅地址。
更新并修改订阅配置的脚本(Python,PyYAML,核心)#
# -*- encoding: utf-8 -*-
#@Author  :   Arthals
#@File    :   updater.py
#@Time    :   2023/04/28 20:42:24
#@Contact :   zhuozhiyongde@126.com
#@Software:   Visual Studio Code

import requests
import os
import yaml


def update():
    url = 'https://yoursubscribe.url'

    r = requests.get(url, timeout=10)
    data = yaml.safe_load(r.text)

    # 添加外部访问密码
    data['secret'] = 'xxxxxxx'

    # 添加 PKU VPN
    pku_proxy = {
        'name': 'PKU',
        'server': '127.0.0.1',
        'port': 11080,
        'type': 'socks5'
    }

    data['proxies'].insert(0, pku_proxy)

    pku_group = {'name': '🎓 北京大学', 'type': 'select', 'proxies': ['PKU']}

    data['proxy-groups'].insert(0, pku_group)
    # 一定要让 vpn 在前面,否则不能兼容 Clash 的 TUN 模式
    data['rules'].insert(0, 'DOMAIN-SUFFIX,vpn.pku.edu.cn,DIRECT')
    data['rules'].insert(1, 'DOMAIN-SUFFIX,pku.edu.cn,🎓 北京大学')

    # 添加自定义规则
    with open('custom_rules.txt', 'r', encoding='utf-8') as f:
        rules = f.readlines()
        for rule in rules:
            rule = '%s,🔰 节点选择' % rule.rstrip("\n")
            data['rules'].insert(0, rule)

    # 添加 fallback 策略组
    fallback_group = {
        'name': '🍂 Fallback',
        'type': 'fallback',
        'proxies': ['♻️ 自动选择'],
        'url': 'http://www.gstatic.com/generate_204',
        'interval': 300
    }
    data['proxy-groups'].insert(0, fallback_group)

    # 导出 yaml 文件
    yaml.Dumper.ignore_aliases = lambda *args: True
    with open('Arthals.yaml', 'w') as file:
        yaml.dump(data, file, allow_unicode=True, default_flow_style=False)
        # print(t.encode('UTF-8'))


if __name__ == '__main__':
    try:
        update()
        os.system('pm2 restart Clash')
        os.system(
            'export https_proxy=http://127.0.0.1:7890 http_proxy=http://127.0.0.1:7890 all_proxy=socks5://127.0.0.1:7890'
        )

    except Exception as e:
        print(repr(e))
定时更新配置文件(Crontab)#
# crontab, refresh every 6 hours
0 */6 * * * python ~/.config/clash/updater.py >> ~/.config/clash/update.log 2>&1守护 Clash 代理进程(PM2,可不配置)#
// PM2 Config for Clash
module.exports = {
  apps: [
    {
      name: 'Clash',
      script: './clash -f ~/.config/clash/Arthals.yaml'
    }
  ]
}当然,你也可以使用诸如 nohup 之类的其他方法替代 PM2 实现守护进程,使用 schedule 库来替代 Crontab 定时执行。
启动后端订阅接口服务(Python,FastAPI)#
用以提供自定义地址,供自己的电脑更新使用。
#!/usr/bin/env python
# -*- encoding: utf-8 -*-
#@Author  :   Arthals
#@File    :   CustomAPI.py
#@Time    :   2023/09/20 00:46:28
#@Contact :   zhuozhiyongde@126.com
#@Software:   Visual Studio Code

from fastapi import FastAPI, Response

app = FastAPI()

def get_clash_config():
    # 打开/home/ubuntu/.config/clash/Arthals.yaml,并以UTF-8编码返回
    try:
        with open('/home/ubuntu/.config/clash/Arthals.yaml',
                  'r',
                  encoding='utf-8') as f:
            resp = f.read()
            return resp
    except Exception:
        return None

@app.get('/clash')
async def get_config(token: str):
    # 检查params中是否有token,且token是否正确
    if token != 'xxxxxxx':
        return Response(status_code=403)

return Response(content=get_clash_config(), media_type='text/plain')守护后端订阅接口服务(PM2)#
// PM2 Config for CustomAPI
module.exports = {
  apps: [
    {
      name: 'CustomAPI',
      script: 'uvicorn CustomAPI:app --port 2625 --host 0.0.0.0 --reload'
    }
  ]
}在对应文件夹启动相关 PM2 服务即可,然后再配置一个反向代理(服务器)或者直接在本地启动,然后将转换后的 URL 填入 Clash 就完成了~
我的目录结构如下,供参考:
tree -P "Custom-API|\.config/clash" --matchdirs --prune -a -L 4
.
├── .config
│   └── clash
│       ├── Arthals-without-pku.yaml
│       ├── Arthals.yaml
│       ├── cache.db
│       ├── clash
│       ├── clash-old
│       ├── clash_rule_providers.yaml
│       ├── clash_rules.yaml
│       ├── config.yaml
│       ├── Country.mmdb
│       ├── ecosystem.config.js
│       ├── raw-update.sh
│       ├── update.log
│       ├── updater.py
│       └── update.sh
└── Custom-API
    ├── CustomAPI.py
└── ecosystem.config.js生成的 YAML 配置文件大致如下:
allow-lan: true
external-controller: :9090
log-level: info
mode: Rule
port: 7890
proxies:
-   name: PKU
    port: 11080
    server: 127.0.0.1
    type: socks5
...
proxy-groups:
-   name: 🎓 北京大学
    proxies:
    - PKU
    - DIRECT
    type: select
...
rules:
- DOMAIN-SUFFIX,pku.edu.cn,🎓 北京大学
- RULE-SET,private,DIRECT
- RULE-SET,reject,REJECT
...
- MATCH,DIRECT
secret: xxxxxxx
socks-port: 7891
折腾完这些后,你就可以实现身在家里网在校的代理环境啦~
客户端#
在客户端,你需要做的事情是:
- 启动 Docker 代理服务器
- 在 Clash 中填写服务端配置好的订阅 URL
具体的配置方式,请参照前文的 PKU VPN 一节。
基于 Clash Parser 的客户端配置方案(最简洁)#
parsers:
  - url: https://you-subscribe-url
    yaml:
      prepend-proxy-groups:
        - name: 🎓 北京大学
          type: select
          proxies:
            - PKU
            - DIRECT
      prepend-proxies:
        - name: PKU
          port: 11080
          server: localhost
          type: socks5
      prepend-rules:
- DOMAIN-SUFFIX,pku.edu.cn,🎓 北京大学替换订阅地址为你的订阅地址即可。如果你不会使用 Parser,可以自行搜索相关教程。
Class Machine#
对于 VS Code 的 Remote SSH,你需要额外配置 ssh_config 如下:
Host ICS
   HostName 162.105.31.232
   ProxyCommand nc -X 5 -x 127.0.0.1:11080 %h %p
   Port 22222
User u2222222222即你需要额外配置一个 ProxyCommand 以实现代理。
这是 macOS 的代理指令,对于其他平台,请参考:https://ericclose.github.io/git-proxy-config.html ↗
Credit#
感谢 @thezzisu ↗ 助教提供的灵感和实现~